Wednesday, September 28, 2011

My first Christmas Card for the year

Whooo hooooo number one done and just five hundred thousand to go (hehehe yes I am known to exaggerate a tad) well sometimes it feels like 500 000. I made this one for Penny Black Saturday challenge this week, which is monochromatic and I just had to have a go again this week. This stamp is one of my newer Penny Black purchases that I just had to have last year hehehe, it's called crystal wreath and isn't it soooo pretty. Ok well I am going to go and keep playing with my calico flowers - I hope you are all having a happy day - if not get back in bed and climb out the other side, cause life is just too short to have unhappy days. :) x joy

oppps I always forget to do this part( hehehe yes I am known to be forgetful as well LOL), as well as the Penny Black stamp I have used my Nellie Snellen doiley die, cuttlebug snowflakes embossing folder, brilliance pearlescent sky blue ink, kaiser rhinestones, and bazzill card.

Sunday, September 25, 2011

Playing with Fabric

OOOOOHHHHHH my goodness, fancy two blog posts in one day hehehe but boy have I had fun today and look what I made hehehe. I have been playing with fabric and Tim Holtz dies and my big shot. The other day at the markets a lady asked me if I could make her one of my tissue paper flowers out of fabric for a brooch or hat pin so I had a try. I think I will still keep playing but these are the proto types. Together with the free button cards that I got from Paper Craft Inspirations I think they look great. Ok well I am off to go sit at the local pool with my boys for the afternoon as it is ridiculously hot here today blah blah blah and I don't do well in the heat - so I need to find a little spot of shade and read my favourite mags x joy

Woodland Folk Badger

Well hello and happy Sunday to you all. I have had a very pleasant day, starting with a lovely sleep in and then a spot of crafting. I brought this Woodland Folk Badger die the other day and wanted to have a go but I am not really happy with the end result. I have teamed him with the papers from the woodland folk range but think I will have to have another play and see what else I can come up with. I'm not sure whether it is the black and white against the browns or not. Anyway at least it didn't end up in the bin. Let me know what you think. Ok well now I am off to play with my Tim Holtz die's and some calico - should be fun - I'll let you know what I create. Have a happy afternoon x joy


Tuesday, September 20, 2011

Penny Black Favourite

This weeks challenge on Penny Black Saturday challenge made me think of one of my all time favourite stamps, so I decided to get crafting and have a go. Rain or shine friends was one of the first stamps that I purchased - I am trying to remember if it was in '96 or '97 - anyway, whenever it was - it was a long time ago hehe boy do I feel old sometimes!!!!!! I just love these little girls and didn't want to distract too much from the stamped image, so kept the rest of the card fairly plain. These are not normal colours for me either, but I like their effect. I hope you like it x joy

Monday, September 12, 2011

Another Wedding Project

Hello Monday and what a lovely Monday it is. I have been a busy little bee again - with our papercrafting group on Friday and Saturday - which was sooooo much fun. So many giggles and so little time hehehe. I think I may have been guilty of talking toooo much again as I only managed to get three cards done in two days. I will put them up a little later but for now here is another wedding project that I have been working on. This one is for a real wedding (unlike my mini wedding set, that I made just for the fun of it).

One of our schools super special teachers is getting married later in the month and I was asked if I could do up a card for her and her fiance by one of my  papercrafting buddies Anne, who thought it would be a great idea to get Angela's prep and year one students to each make a picture. So Anne set to work and got all the kiddos to draw Angela's wedding all on 14 x 14cm paper. And once I got them I  mounted each one on 15 x 18cm card which I bound together and made this book up.

I soon realised that it would not fit into an envelope so had to whip up a lovely box to put it into (which meant I got to play and decorate another surface). For now I will just upload the main pictures  - each inside page is decorated on the opposite side to the childrens drawings but it has 20 odd pages so it will take ages to upload. I really am happy with the result and I must say I was so pleased with it - I whipped it around to Anne's place to show her before I had even photographed it. It will be delivered to school tomorrow morning in secret and be presented to Angela on Thursday just before school breaks up for September school holidays. I hope she likes it.


Sunday, August 28, 2011

Mini Wedding Set

Hello and happy Sunday, finally I can show you what I have been doing lately. I wanted to get it all finished before I blogged about it. It is a minature wedding set - and boy has it taken me ages to make hehehe my fingers are still numb from making a total of 157 minature roses (i have put how i made them up on my new tutorial page) all those flowers where made using 785 seperate punched shapes.

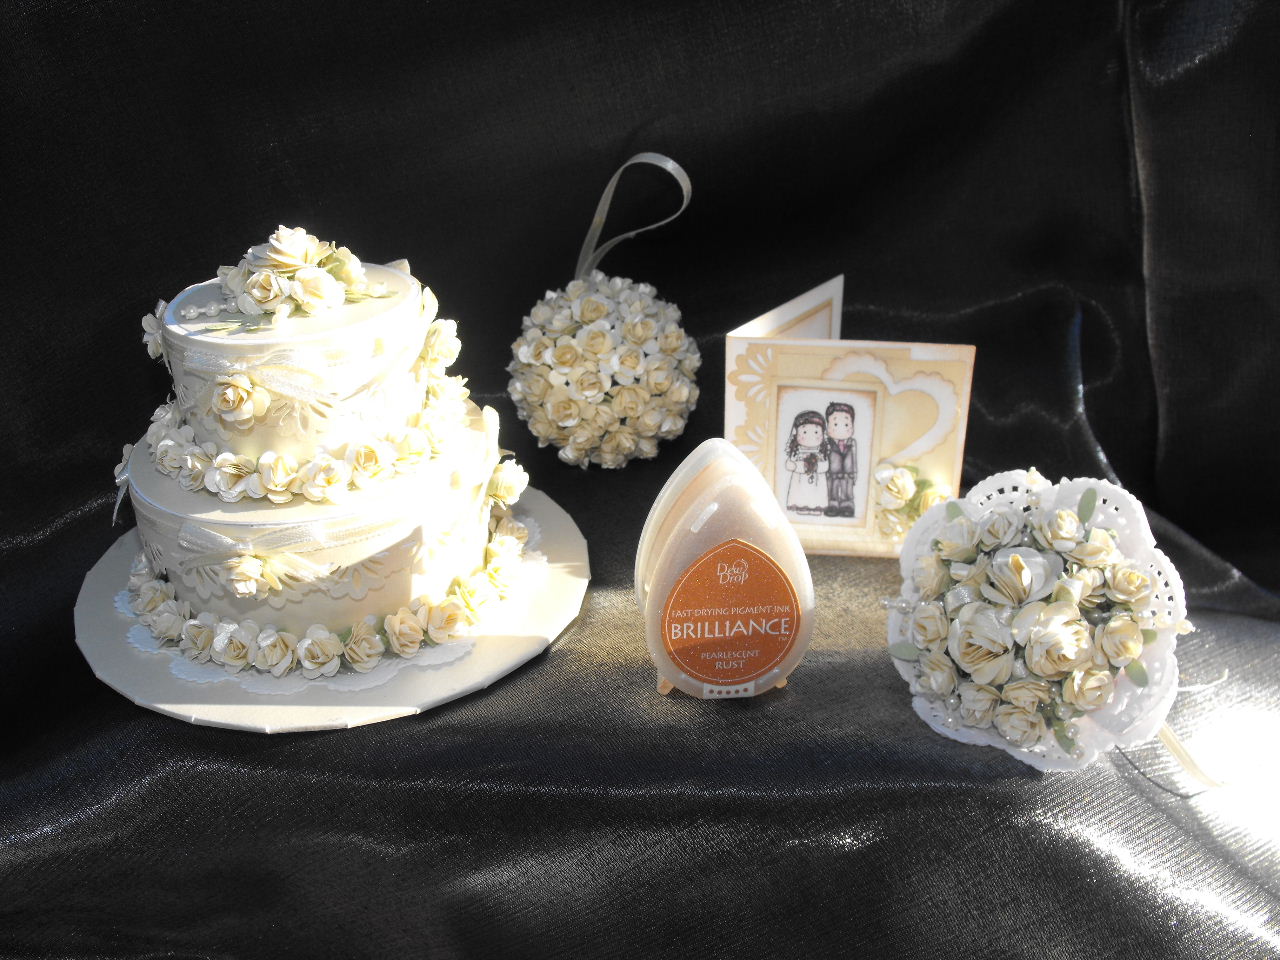
Next Saturday here in Blackall is the local flower show and I was asked to do a little display of handmade flowers to show everyone some of the things that we do at our local paper crafting days and this is what I came up with. I started off thinking about the ball and thought how nice they would look at a wedding so then the cake came to mind and then you can't have a wedding without a bouquet and being a card maker that I am - I couldn't not make a minature card as well.

To give you an idea of how big they are, I took this next image with a dew drop ink pad in the photo as well.


And here are some close ups for you.

The cake opens up at the top of each tier, it has 60 flowers and I have used a compact disc covered in paper for the cake board. It measures 5.75cms across the top tier and 8 cms across the bottom tier. And is a total of 9cm high to the tip of the top flower.
The ball has a total of 76 little flowers on it. It is actually the roller ball out of an under arm roll on deoderant (shhhhhhh don't tell any one - I did wash it well before using it) I have actually been collecting them for awhile now because they looked useful for something. Firstly I wrapped the hanging ribbon around the ball then starting at the top I attached the flowers one by one with  the hot glue gun. I started with 30 flowers made and soon realised it was not enough. It measures 5cms across the widest part.

This is a close up of  the mini bouquet it is 6.5cm from edge of the doiley to the other side.

This is the underside. I really tried hard to make it as realistic as possible.

 And finally the mini card - it measures 5.5cm x 5.5cm. I used a normal sized magnolia stamp  that I had coloured with watercolours and I then scanned it and shrunk it to the size I wanted. Hehehe I had sooooo much fun with this set - I hope you like it - Please leave a comment and tell me what you think :) x joy

Friday, August 26, 2011

13th Birthday Invitations


These are a few draft's of invitations that I have made to show someone who has asked me to make some for her daughters 13th birthday. The trick was to include something to do with horses and soccer along with the colour pink. I ended up on My Grafico and found a great set of digi stamps with these cute horse shoes and luckily in my stash I had these soccer ball brads although I only have 12 and we need 15 - so online I went again and found them at  the eyelet outlet ,so I am just waiting on them arriving. I am happy with the results - what do you think?